Mardi Gras King Cakes

Leave a comment

History behind the King Cake…

As part of the Christian faith, the coming of the wise men bearing gifts to the Christ Child is celebrated twelve days after Christmas. This is referred to as the Feast of the Epiphany or Little Christmas on the Twelfth Night. This is a time of celebration, exchanging gifts and feasting. Today, the tradition continues as people all over the world gather for festive Twelfth Night celebrations. A popular custom was and still is the baking of a special cake in honor of the three kings called “A King’s Cake.”
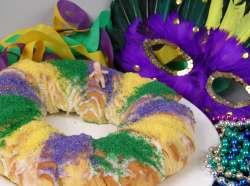
Inside every cake is a tiny baby (generally plastic now, but sometimes this baby might be made of porcelain or even gold). The tradition of having King Cake Parties has evolved through time, and the person who receives the slice of cake with the baby is asked to continue the festivities by hosting the next King Cake party.

Originally, King Cakes were a simple ring of dough with a small amount of decoration. Today’s King Cakes are much more festive. After the rich Danish dough is braided and baked, the “baby” is inserted. The top of the ring or oval cake is then covered with delicious sugar toppings in the traditional Mardi Gras colors of purple, green and gold.

In more recent years, some bakeries have been creative with stuffing and topping their cakes with different flavors of cream cheese and fruit fillings.

January 6, the Twelfth Night after Christmas, is also the day our Mardi Gras season begins. Mardi Gras Day is always 47 days prior to Easter Sunday (Fat Tuesday is always the day before Ash Wednesday).

Soooooo…. In anticipation of the Mardi Gras spirit, you can follow this delicious recipe & make your own KING CAKES for your next Mardi Gras celebration!!

Here’s what you will need:
PASTRY:
  • 1 cup milk
  • 1/4 cup butter
  • 2 (.25 ounce) packages active dry yeast
  • 2/3 cup warm water (110 degrees F/45 degrees C)
  • 1/2 cup white sugar
  • 2 eggs
  • 1 1/2 teaspoons salt
  • 1/2 teaspoon freshly grated nutmeg
  • 5 1/2 cups all-purpose flour
  • FILLING:
  • 1 cup packed brown sugar
  • 1 tablespoon ground cinnamon
  • 2/3 cup chopped pecans
  • 1/2 cup all-purpose flour
  • 1/2 cup raisins
  • 1/2 cup melted butter
  • FROSTING:

  • 1 cup confectioners’ sugar
  • 1 tablespoon water
  • Directions

    1. Scald milk, remove from heat and stir in 1/4 cup of butter. Allow mixture to cool to room temperature. In a large bowl, dissolve yeast in the warm water with 1 tablespoon of the white sugar. Let stand until creamy, about 10 minutes.
    2. When yeast mixture is bubbling, add the cooled milk mixture. Whisk in the eggs. Stir in the remaining white sugar, salt and nutmeg. Beat the flour into the milk/egg mixture 1 cup at a time. When the dough has pulled together, turn it out onto a lightly floured surface and knead until smooth and elastic, about 8 to 10 minutes.
    3. Lightly oil a large bowl, place the dough in the bowl and turn to coat with oil. Cover with a damp cloth or plastic wrap and let rise in a warm place until doubled in volume, about 2 hours. When risen, punch down and divide dough in half.
    4. Preheat oven to 375 degrees F (190 degrees C). Grease 2 cookie sheets or line with parchment paper.
    5. To Make Filling: Combine the brown sugar, ground cinnamon, chopped pecans, 1/2 cup flour and 1/2 cup raisins. Pour 1/2 cup melted butter over the cinnamon mixture and mix until crumbly.
    6. Roll dough halves out into large rectangles (approximately 10×16 inches or so). Sprinkle the filling evenly over the dough and roll up each half tightly like a jelly roll, beginning at the wide side. When both are rolled, twist the rolls together and transfer to a parchment-lined baking sheet, form into a circle, and seal the edges together. With scissors make cuts 1/3 of the way through the rings at 1 inch intervals. Let rise in a warm spot until doubled in size, about 45 minutes.

    Twist the 2 parts together

    Join ends of twisted dough

    7. Bake in preheated oven for 30 minutes. Push the doll into the bottom of the cake. Frost while warm with the confectioners’ sugar blended with 1 to 2 tablespoons of water. Add pruple, green, and yellow sugar crystals to garnish~

    Bake for 30 minutes

    Laissez Les Bon Temps Roulez!

    ~Let the Good Times Roll~

    What Makes a Good Cupcake???

    Leave a comment

    When I first decided that I wanted to venture into the world of cupcakes, I had to ask myself “What makes a damn good cupcake?”  Now don’t get me wrong.  I completely understand that some things are totally objective.  I get that.  But let’s face it.  There are simply some things that can’t be overlooked.  For the sake of time (and sanity), I will focus on those things. 

    First things first.  The number 1 factor in determining if your cupcakes are good is moistnessThe term moistness simply refers to the freshness & softness of your dessert.  No one wants to eat a cupcake (or any cake for that matter) that is dried out.  There is no one single method of obtaining the most moist cupcake ever, but I’ve heard a few tips in my baking career that I don’t mind sharing.  Tip 1: Dont overbake the cupcakes.  A baking thermometer can help with this. Remember:  Cupcakes continue to bake in the pan after you take them out of the oven, so please plan accordingly. Tip 2:  Minimize your cupcake’s exposure to the air.  I like to store my cupcakes (at home) in an air tight Tupperware style cake plate or cupcake tray. Tip 3:  Increase the fat content, whether oil, shortening, or butter. Liquid fats tend to work really well to keep moisture, hence why oil is included in your moistest cake recipes.

    Secondly, “Good Cupcakes” must have a good flavor.  The flavor of the actual icing on your cupcake is just as important as the cupcake flavor itself.  Now flavors don’t necessarily have to be complex in order to be “good”, but the flavors must be clean, distinct & complementing.  Have fun with your flavors! Don’t be afraid to experiment & try new things, but just make sure those who have to eat your cupcakes can recognize the flavors that they are eating.  They need to taste like what they are supposed to taste like.  If your cupcake has a strawberry based flavor, people should recognize that they are eating something that taste like strawberries.  Good flavor combinations will feel like a party in your mouth! 

    Lastly, good cupcakes (especially when you are presenting them to the public) need to look good.  Thats right.  Appearance can make or break your cupcakes.  If they don’t look good, no one will want to eat them.  Good color combinations of your icing and decorations is important.  Make sure the colors complement each other, or compliment the theme you are going for. If you want to keep your frostings & decorations simple, you can always use decorative cupcake liners to spice things up a bit. 

    What do you think?  What would you add to my top 3 things?  Let’s hear it!

    ~Peace. Love. Cupcakes.